GitHub has recently introduced a "secret" feature to show a markdown template on your profile page. You may have heard about this. All you need to do is create a repo named with your username and create the README.md file there.
When we think of a template markdown on GitHub we normally think of static content. However, in this article, I want to go a little further. I'll tell you how to add content that is going to be updated from time to time; whether it's about your latest tweets, your latest youtube video or your latest blog posts.

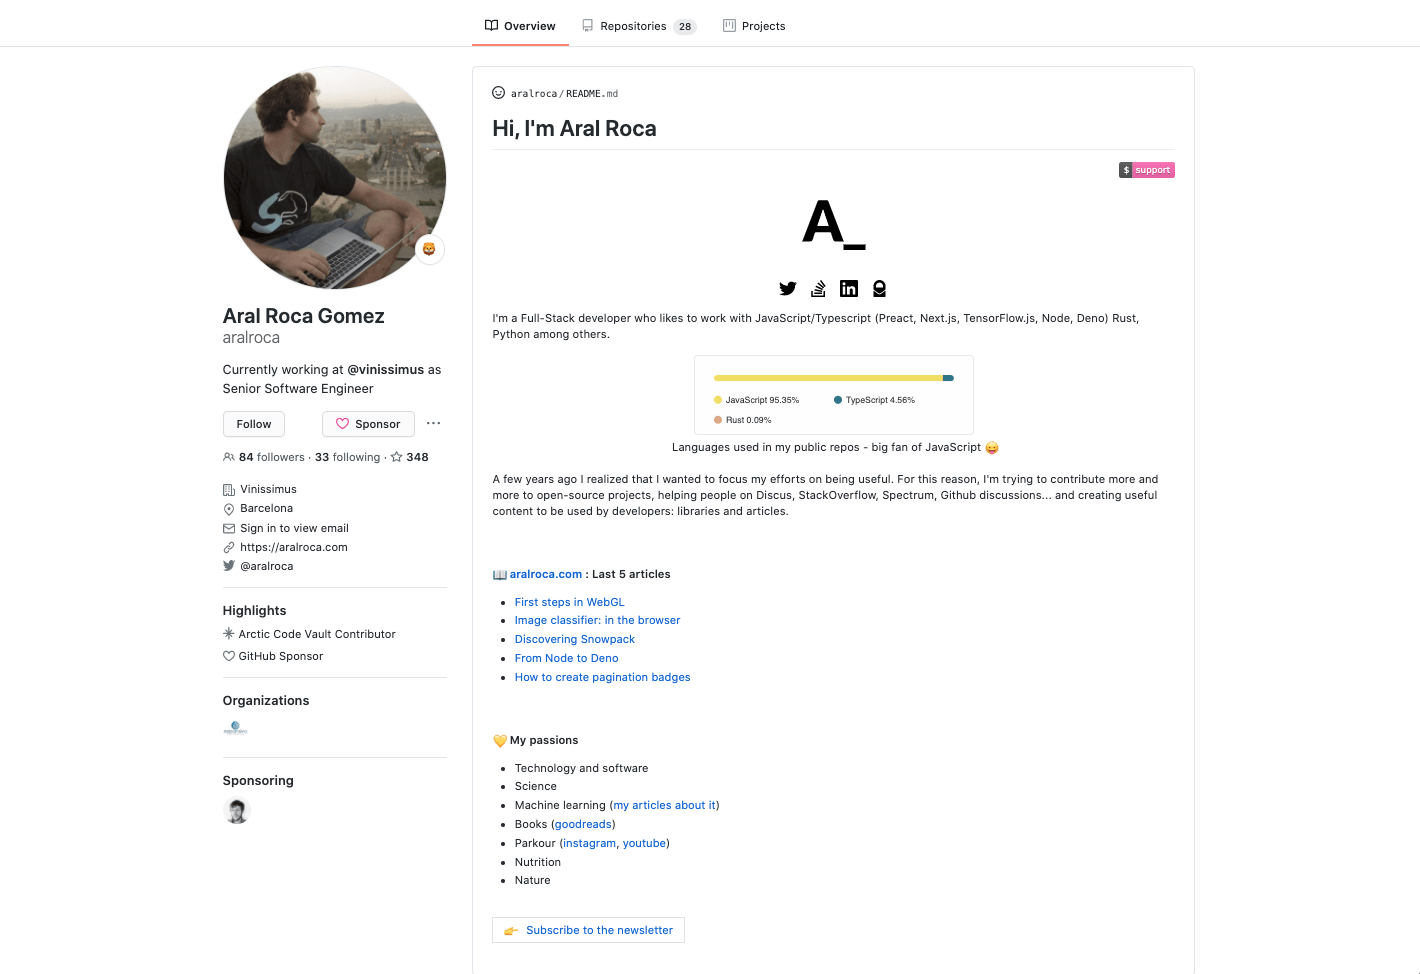
My GitHub README profile under aralroca repo
We'll cover the following:
About Static Readme Regeneration (SRR)
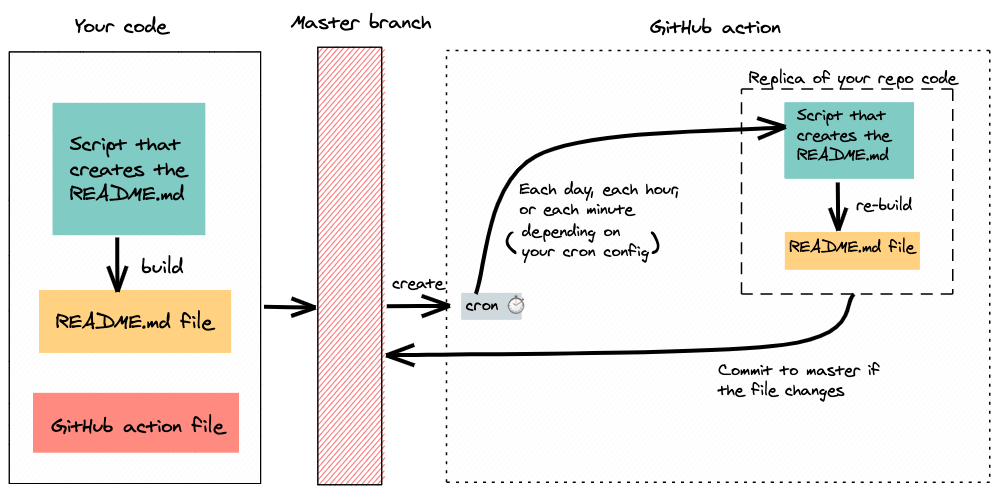
By "Static Readme Regeneration" I mean that the file README.md is generated by our script, and then we update the content through a bot that periodically (programmed by us) makes a re-build of the README.md. The beauty of this is in the fact that the bot only commits to the repo if README.md has really changed. This way the content of the README can't be entirely static, it can change every day, every hour, or even every minute.
In order to do this, we'll use a GitHub Action with a cron:

Diagram about static regeneration with GitHub Actions
Implementation
I'm going to use as example what I did in my profile. It always shows the last 5 articles of my blog and updates every day (if necessary). This way I can relax because I know that when I upload a new post in my blog, the README.md file of my profile will be automatically updated.
README.tpl
Let's create a README.md.tpl file, the .tpl format is used in template files. This file will contain all the static content of the README.md. We'll write the markdown here as if we were writing in the README.md file.
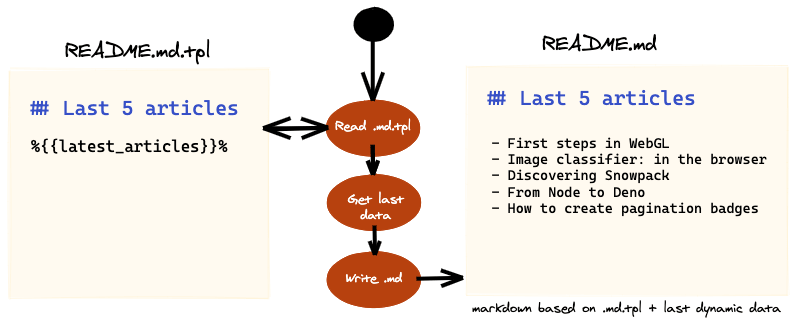
The main difference is that we'll add what we want to be dynamic with some interpolation symbols. This way, our script will be able to replace them with dynamic content.
 Diagram about interpolation from
 .md.tpl to .md
Script to generate the README.md
The script have to:
- Read the file
README.tpl.md. - Fetch all the posts from https://aralroca.com/rss.xml.
- Sort by
pub_date+ filter 5. - Write the
README.mdfile replacing the interpolation fromREADME.tpl.mdto the 5 articles as markdown string.

This can be implemented in any language; JavaScript, Rust, Python, Go, C... In this case, I chose Rust, mostly because I have no experience with it and so I took the opportunity to learn a little (feel free to create an issue on the repo if you are a Rust expert and see things that could be improved).
> main.rs
mod create_readme;

use create_readme::create_readme;

fn main() {
    match create_readme() {
        Ok(_v) => println!("README.md file generated correctly"),
        Err(e) => println!("Opps! there was an error: {:?}", e),
    }
}
> create_readme.rs
extern crate chrono;
extern crate rss;

use chrono::DateTime;
use rss::Channel;
use std::cmp::Ordering;
use std::fs;

struct FeedItem {
    title: String,
    link: String,
    pub_date: String,
}

pub fn create_readme() -> std::io::Result<()> {
    let tpl =
        fs::read_to_string("README.md.tpl")
        .expect("Something went wrong reading the README.tpl file");

    let last_articles = get_latest_articles();

    return fs::write(
        "README.md",
        tpl.replace("%{{latest_articles}}%", &last_articles),
    );
}

fn get_latest_articles() -> String {
    let mut posts: Vec<FeedItem> = get_blog_rss();

    // Sort articles by pub_date
    posts.sort_by(|a, b| {
        let date_a = DateTime::parse_from_rfc2822(&a.pub_date).unwrap();
        let date_b = DateTime::parse_from_rfc2822(&b.pub_date).unwrap();

        if date_b < date_a {
            Ordering::Less
        } else if date_b > date_a {
            Ordering::Greater
        } else {
            Ordering::Equal
        }
    });

    // Filter las 5 articles + format each one as markdown list string
    return posts[..5].iter().fold("".to_string(), |acc, item| {
        format!("{} \n* [{}]({})", acc, item.title, item.link)
    });
}

// Fetch all articles of my blog on rss.xml
fn get_blog_rss() -> Vec<FeedItem> {
    let items = Channel::from_url("https://aralroca.com/rss.xml")
        .unwrap()
        .items()
        .iter()
        .map(|item| FeedItem {
            title: item.title().unwrap().to_string(),
            link: item.link().unwrap().to_string(),
            pub_date: item.pub_date().unwrap().to_string(),
        })
        .collect();

    items
}
GitHub Action with a cron
Once we have the script that builds our README.md, we just need to generate the cron using GitHub Action.
In order to create an Action, I recommend first uploading your script to the master branch and then clicking the "Actions" tab of GitHub to create it. This way, GitHub detects the script language (Rust in our case) and creates a default yaml.

We're going to replace some things from the default yaml in order to:
- Schedule a cron
- Run the script (
cargo runinstead ofcargo build && cargo test) - Commit the regenerated README (only if has changes)
> .github/workflows/rust.yml
name: Rust

on:
  # Schedule a cron
  schedule:
    - cron: '0 0 */1 * *' # each day at 00:00 UTC

env:
  CARGO_TERM_COLOR: always

jobs:
  build:
    runs-on: ubuntu-latest

    steps:
      - uses: actions/checkout@v2
      - name: Build

        # Replace "cargo build" to "cargo run" to run the script
        run: cargo run

      # Commit the regenerated README only when it change
      # (git diff --quiet && git diff --staged --quiet )
      - run: |
          git config user.name aralroca
          git config user.email aral-rg@hotmail.com
          git add README.md
          git diff --quiet && git diff --staged --quiet || git commit -m "[gh-action] Update README"
          git push origin master
Conclusion
To conclude, although in most repos the README file is always static, thanks to GitHub Actions and this new feature of GitHub we can build our README.md to always have our profile up to date with the latest updates (releases, pr, tweets, posts...).


