In this article we continue what we started in "First steps in WebGL", where we saw what it is and how it works internally: the shaders, the program, buffers, how to link data from CPU to GPU, and finally how to render a triangle. To understand all this well, I recommend first reading the previous chapter.
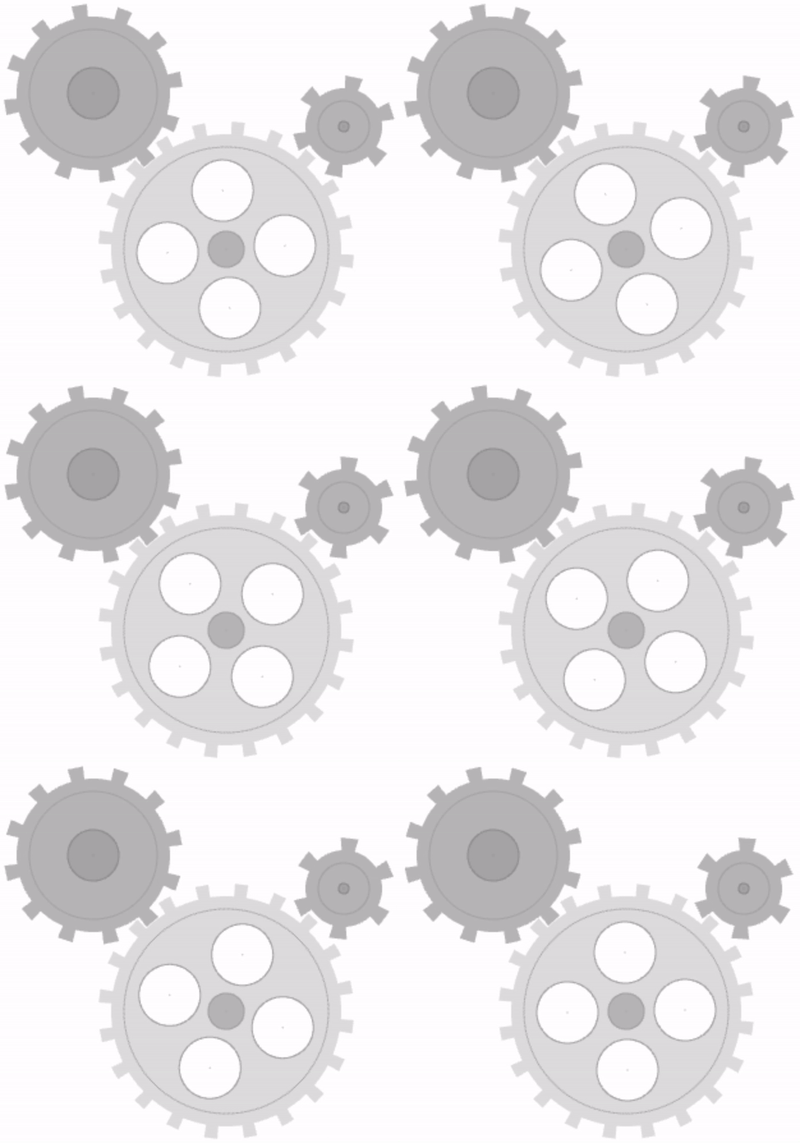
Here, instead of rendering a triangle, we'll see how to render more complex structures and how to give it movement. To do that we'll implement three dynamic gears:
We will cover the following:
- Identifying shapes
- Identifying data to draw
- How we will implement the rotation
- Let's implement it!
- Show me all the code
- Conclusion
- References
Identifying shapes
The gears we want to draw are composed of circles. Among these circles there are certain varieties: a circle with teeth, a circle with colored border and circle filled with a color.
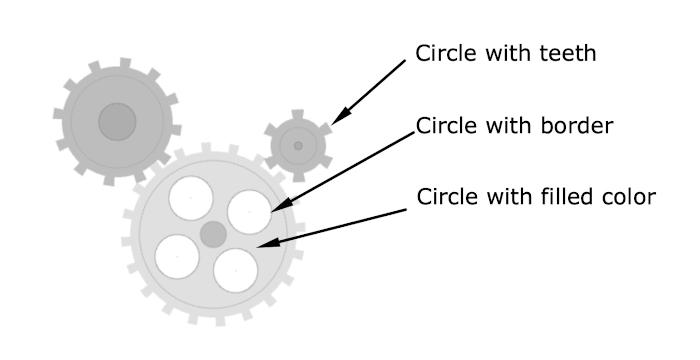
Therefore, this confirms that we can draw these gears by drawing circles but, as we saw in the previous article, in WebGL you can only rasterize triangles, points, and lines... So, what's the difference between these circles and how can we make each of them?
Circle with border
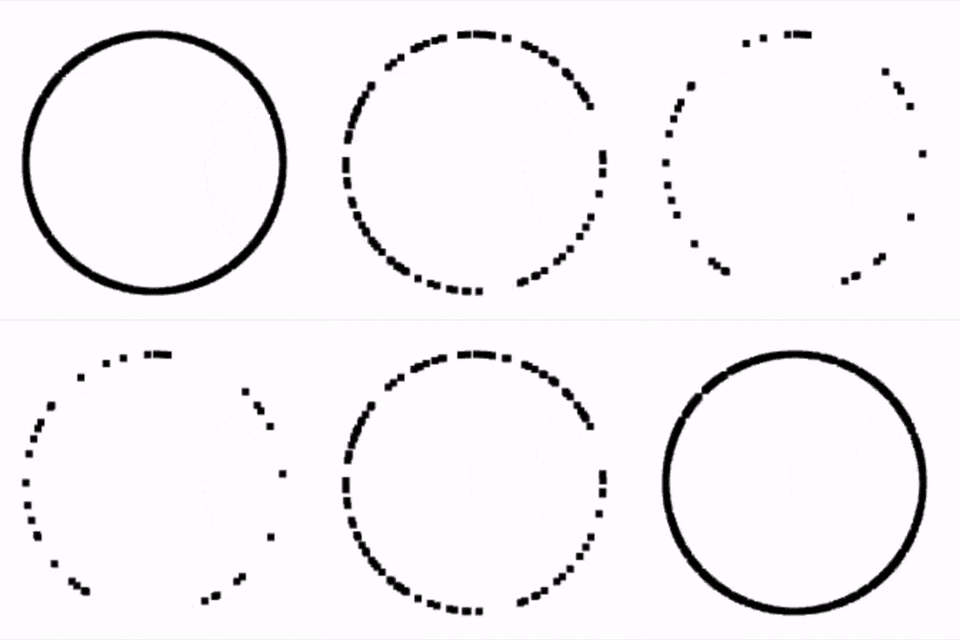
To draw a circle with a border, we'll use multiple points:
Circle with filled color
To draw a circle with a filled color, we'll use multiple triangles:

The drawing mode needed for this is Triangle strip:
A triangle strip is a series of connected triangles from the triangle mesh, sharing vertices, allowing for more efficient memory usage for computer graphics. They are more efficient than triangle lists without indexing, but usually equally fast or slower than indexed triangle lists. The primary reason to use triangle strips is to reduce the amount of data needed to create a series of triangles. The number of vertices stored in memory is reduced from 3N to N+2, where N is the number of triangles to be drawn. This allows for less use of disk space, as well as making them faster to load into RAM. Source: Wikipedia
Circle with teeth
For the gear teeth, we'll also use triangles. This time, without the "strip" mode. This way we'll draw triangles that go from the center of the circumference to the outside.

While we build the teeth, it's important that we create another circle inside filled with color to make the effect that the teeth are coming out of the circle itself.
Identifying data to draw
One thing these 3 types of figures have in common is that we can calculate their coordinates from 2 variables:
- Center of the circle (x and y)
- Radius
As seen in the previous article, the coordinates within webGL go from -1 to 1. So let's locate the center of each piece of gear and its radius:
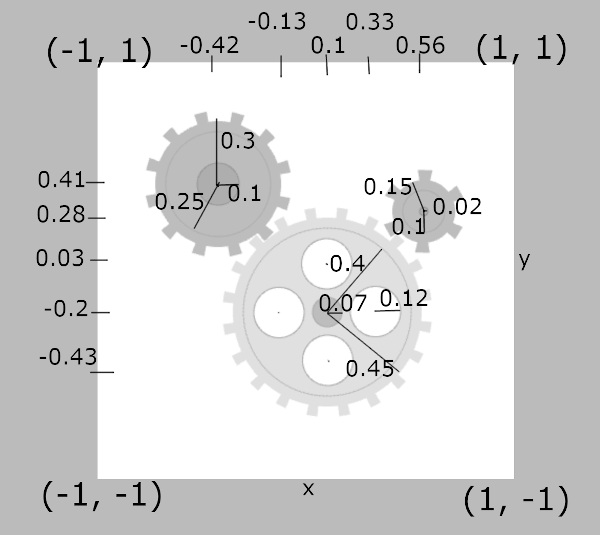
In addition, we have optional variables for specific figures such as:
- Number of teeth
- Stroke color (color of the border)
- Fill color
- Children (more pieces of the same gear with the same data structure)
- Direction of the rotation (only valid for the parent)
At the end, in JavaScript, we'll have this array with the data of the three gears and all their pieces:
const x1 = 0.1
const y1 = -0.2

const x2 = -0.42
const y2 = 0.41

const x3 = 0.56
const y3 = 0.28

export const gears = [
  {
    center: [x1, y1],
    direction: 'counterclockwise',
    numberOfTeeth: 20,
    radius: 0.45,
    fillColor: [0.878, 0.878, 0.878],
    children: [
      {
        center: [x1, y1],
        radius: 0.4,
        strokeColor: [0.682, 0.682, 0.682],
      },
      {
        center: [x1, y1],
        radius: 0.07,
        fillColor: [0.741, 0.741, 0.741],
        strokeColor: [0.682, 0.682, 0.682],
      },
      {
        center: [x1 - 0.23, y1],
        radius: 0.12,
        fillColor: [1, 1, 1],
        strokeColor: [0.682, 0.682, 0.682],
      },
      {
        center: [x1, y1 - 0.23],
        radius: 0.12,
        fillColor: [1, 1, 1],
        strokeColor: [0.682, 0.682, 0.682],
      },
      {
        center: [x1 + 0.23, y1],
        radius: 0.12,
        fillColor: [1, 1, 1],
        strokeColor: [0.682, 0.682, 0.682],
      },
      {
        center: [x1, y1 + 0.23],
        radius: 0.12,
        fillColor: [1, 1, 1],
        strokeColor: [0.682, 0.682, 0.682],
      },
    ],
  },
  {
    center: [x2, y2],
    direction: 'clockwise',
    numberOfTeeth: 12,
    radius: 0.3,
    fillColor: [0.741, 0.741, 0.741],
    children: [
      {
        center: [x2, y2],
        radius: 0.25,
        strokeColor: [0.682, 0.682, 0.682],
      },
      {
        center: [x2, y2],
        radius: 0.1,
        fillColor: [0.682, 0.682, 0.682],
        strokeColor: [0.6, 0.6, 0.6],
      },
    ],
  },
  {
    center: [x3, y3],
    direction: 'clockwise',
    numberOfTeeth: 6,
    radius: 0.15,
    fillColor: [0.741, 0.741, 0.741],
    children: [
      {
        center: [x3, y3],
        radius: 0.1,
        strokeColor: [0.682, 0.682, 0.682],
      },
      {
        center: [x3, y3],
        radius: 0.02,
        fillColor: [0.682, 0.682, 0.682],
        strokeColor: [0.6, 0.6, 0.6],
      },
    ],
  },
]
For the colors, a little reminder: they go from 0 to 1, instead of 0 to 255, or 0 to F, as we are accustomed in CSS. For example [0.682, 0.682, 0.682] would be equivalent to rgb(174, 174, 174) and #AEAEAE.
How we will implement the rotation
Before we begin the implementation, we need to know how to implement the rotation of each gear.
In order to understand the rotation and other linear transformations, I highly recommend the serie about linear algebra from 3blue1brown YouTube channel. In special, this video explains it very well:
To sum up, if we multiply our positions by any matrix, it receives a transformation. We have to multiply each gear position by the rotation matrix. We need to add every "transformation" in front of it. If we want to rotate, we will do rotation * positions instead of positions * rotation.
We can create the rotation matrix by knowing the angle in radians:
function rotation(angleInRadians = 0) {
  const c = Math.cos(angleInRadians)
  const s = Math.sin(angleInRadians)

  return [
    c, -s, 0,
    s, c, 0,
    0, 0, 1
  ]
}
This way we can make each gear turn differently by multiplying the positions of each gear with its respective rotation matrix. To have a real rotation effect, in each frame we must increase the angle a little bit until it gives the complete turn and the angle returns to 0.
However, it's not enough to simply multiply our positions with this matrix. If you do it, you'll get this:
rotationMatrix * positionMatrix // This is not what we want.

We've got every gear doing its rotation but the axis of rotation is always the center of the canvas, and that's incorrect. We want them to rotate on their own center.
In order to fix this, first, we'll use a transformation named translate to move our gear to the center of the canvas. Then we'll apply the right rotation (the axis will be the center of the canvas again, but in this case, it's also the center of the gear), and finally, we'll move the gear back to its original position (by using translate again).
The translation matrix can be defined as follows:
function translation(tx, ty) {
  return [
    1, 0, 0,
    0, 1, 0,
    tx, ty, 1
  ]
}
We'll create two translation matrices: translation(centerX, centerY) and translation(-centerX, -centerY). Their center must be the center of each gear.
To get that, we'll do this matrix multiplication:
// Now they will turn on their axis
translationMatrix * rotationMatrix * translationToOriginMatrix * positionMatrix

You are probably wondering how to do that each gear spins at its own speed.
There's a simple formula to calculate the speed according to the number of teeth:
(Speed A * Number of teeth A) = (Speed B * Number of teeth B)
This way, in each frame we can add a different angle step to each gear and everyone spins at the speed that they're physically supposed to.
Let's implement it!
Having reached this section, we now know:
- What figures we should draw and how.
- We have the coordinates of each gear and its parts.
- We know how to rotate each gear.
Let's see how to do it with JavaScript and GLSL.
Initialize program with shaders
Let's write the vertex shader to compute the positions of the vertices:
const vertexShader = `#version 300 es
precision mediump float;
in vec2 position;
uniform mat3 u_rotation;
uniform mat3 u_translation;
uniform mat3 u_moveOrigin;

void main () {
  vec2 movedPosition = (u_translation * u_rotation * u_moveOrigin * vec3(position, 1)).xy;
  gl_Position = vec4(movedPosition, 0.0, 1.0);
  gl_PointSize = 1.0;
}
`
Unlike the vertex shader we used in the previous article, we'll pass the u_translation, u_rotation, and u_moveOrigin matrices, so the gl_Position will be the product of the four matrices (along with the position matrix). This way we apply the rotation as we have seen in the previous section. In addition, we'll define the size of each point we draw (which will be useful for the circle with the border) using gl_PointSize.
Note: Matrix multiplication is something we could do directly on the CPU with JavaScript and already pass the final matrix here, but the truth is that the GPU is made precisely for matrix operations so it's much better for performance to do it on the shader. Besides, from JavaScript, we would need a helper to do this multiplication, since we can't multiply arrays directly.
Let's write the fragment shader to compute the color of each pixel corresponding to each location:
const fragmentShader = `#version 300 es
precision mediump float;
out vec4 color;
uniform vec3 inputColor;

void main () {
   color = vec4(inputColor, 1.0);
}
`
As we can see there is no magic added to this fragment, it's the same as in the previous article. Given a defined color in the CPU with JavaScript, we'll pass it to the GPU to color our figures.
Now we can create our program with the shaders, adding the lines to get the uniform locations that we defined in the vertex shader. This way, later while running our script we can send each matrix to each uniform location per each frame.
const gl = getGLContext(canvas)
const vs = getShader(gl, vertexShader, gl.VERTEX_SHADER)
const fs = getShader(gl, fragmentShader, gl.FRAGMENT_SHADER)
const program = getProgram(gl, vs, fs)
const rotationLocation = gl.getUniformLocation(program, 'u_rotation')
const translationLocation = gl.getUniformLocation(program, 'u_translation')
const moveOriginLocation = gl.getUniformLocation(program, 'u_moveOrigin')

run() // Let's see this in the next section
The getGLContext, getShader and getProgram helpers do what we saw in the previous article. I put them down here:
function getGLContext(canvas, bgColor) {
  const gl = canvas.getContext('webgl2')
  const defaultBgColor = [1, 1, 1, 1]

  gl.clearColor(...(bgColor || defaultBgColor))
  gl.clear(gl.DEPTH_BUFFER_BIT | gl.COLOR_BUFFER_BIT)

  return gl
}

function getShader(gl, shaderSource, shaderType) {
  const shader = gl.createShader(shaderType)

  gl.shaderSource(shader, shaderSource)
  gl.compileShader(shader)

  if (!gl.getShaderParameter(shader, gl.COMPILE_STATUS)) {
    console.error(gl.getShaderInfoLog(shader))
  }

  return shader
}

function getProgram(gl, vs, fs) {
  const program = gl.createProgram()

  gl.attachShader(program, vs)
  gl.attachShader(program, fs)
  gl.linkProgram(program)
  gl.useProgram(program)

  if (!gl.getProgramParameter(program, gl.LINK_STATUS)) {
    console.error(gl.getProgramInfoLog(program))
  }

  return program
}
Draw each frame + calculate rotation angles
The run function we have seen called in the previous section will be responsible for the gears being drawn at a different angle in each frame.
// step for a gear of 1 tooth
// gears with more teeth will be calculated with this formula:
// realRotationStep = rotationStep / numberOfTeeth
const rotationStep = 0.2

// Angles are all initialized to 0
const angles = Array.from({ length: gears.length }).map((v) => 0)

function run() {
  // Calculate the angles of this frame, for each gear
  gears.forEach((gear, index) => {
    const direction = gear.direction === 'clockwise' ? 1 : -1
    const step = direction * (rotationStep / gear.numberOfTeeth)

    angles[index] = (angles[index] + step) % 360
  })

  drawGears() // Let's see this in the next section

  // Render next frame
  window.requestAnimationFrame(run)
}
Given the data we have in the gears array, we know the number of teeth and in which direction each gear rotates. With this we can calculate the angle of each gear on each frame. Once we save the new calculated angles, we call the function drawGears to draw each gear with the correct angle. Then we'll recursively call the run function again (wrapped with window.requestAnimationFrame to make sure that it's called again only in the next animation cycle).
You will probably be wondering why we don't implicitly tell to clean the canvas before each frame. It's because WebGL does it automatically when drawing. If it detects that we change the input variables, by default it will clean the previous buffer. If for some reason (not this case) we want the canvas not to be cleaned, then we should have obtained the context with an additional parameter const gl = canvas.getContext('webgl', { preserveDrawingBuffer: true });.
Draw gears
For each gear in each frame, we'll pass to the GPU the necessary matrices for the rotation: u_translation, u_rotation and u_moveOrigin. Then, we'll start drawing each of the pieces of the gear:
function drawGears() {
  gears.forEach((gear, index) => {
    const [centerX, centerY] = gear.center

    // u_translation
    gl.uniformMatrix3fv(
      translationLocation,
      false,
      translation(centerX, centerY)
    )

    // u_rotation
    gl.uniformMatrix3fv(rotationLocation, false, rotation(angles[index]))

    // u_moveOrigin
    gl.uniformMatrix3fv(
      moveOriginLocation,
      false,
      translation(-centerX, -centerY)
    )

    // Render the gear + each gear piece
    renderGearPiece(gear)
    if (gear.children) gear.children.forEach(renderGearPiece)
  })
}
We will draw each piece of the gear with the same function:
function renderGearPiece({
  center,
  radius,
  fillColor,
  strokeColor,
  numberOfTeeth,
}) {
  const { TRIANGLE_STRIP, POINTS, TRIANGLES } = gl
  const coords = getCoords(gl, center, radius)

  if (fillColor) drawShape(coords, fillColor, TRIANGLE_STRIP)
  if (strokeColor) drawShape(coords, strokeColor, POINTS)
  if (numberOfTeeth) {
    drawShape(
      getCoords(gl, center, radius, numberOfTeeth),
      fillColor,
      TRIANGLES
    )
  }
}
- If it's a circle with a border (Fig 3.) --> we'll use
POINTS. - If it's a color-filled circle (Fig 4.) --> we'll use
TRIANGLE_STRIP. - If it's a circle with teeth (Fig 5.) --> we'll use
TRIANGLES.
Implemented with various "ifs", it allows us to create a circle filled with one color but with the border in another color, or a circle filled with color and with teeth. That means more flexibility.
The coordinates of the filled circle and the circle with border, even if one is made with triangles and the other with points, are exactly the same. The one that does have different coordinates is the circle with teeth, but we'll use the same helper to get the coordinates:
export default function getCoords(gl, center, radiusX, teeth = 0) {
  const toothSize = teeth ? 0.05 : 0
  const step = teeth ? 360 / (teeth * 3) : 1
  const [centerX, centerY] = center
  const positions = []
  const radiusY = (radiusX / gl.canvas.height) * gl.canvas.width

  for (let i = 0; i <= 360; i += step) {
    positions.push(
      centerX,
      centerY,
      centerX + (radiusX + toothSize) * Math.cos(2 * Math.PI * (i / 360)),
      centerY + (radiusY + toothSize) * Math.sin(2 * Math.PI * (i / 360))
    )
  }

  return positions
}
What we still need to know would be the helper drawShape, although it's the same code we saw in the previous article: It passes the coordinates and color to paint to the GPU, and calls the function drawArrays indicating the mode (if triangles, points...).
function drawShape(coords, color, drawingMode) {
  const data = new Float32Array(coords)
  const buffer = createAndBindBuffer(gl, gl.ARRAY_BUFFER, gl.STATIC_DRAW, data)

  gl.useProgram(program)
  linkGPUAndCPU(gl, { program, buffer, gpuVariable: 'position' })

  const inputColor = gl.getUniformLocation(program, 'inputColor')
  gl.uniform3fv(inputColor, color)
  gl.drawArrays(drawingMode, 0, coords.length / 2)
}
And voila! We got it.

Show me all the code
I've uploaded all the code for this article to my GitHub. I have implemented it with Preact. All the code can be found inside the hook useGears:
You can also see the demo here:
Conclusion
We have seen how to generate more complex figures using triangles and points. We have even given them movement with matrix multiplications.
There is a drawing mode we haven't seen yet, lines. That's because the lines that can be made with it are very thin, and they wouldn't fit the teeth of the gear. You can't change the thickness of the line easily, to do it you have to make a rectangle (2 triangles). These lines have very little flexibility and most figures are drawn with triangles. Anyway, at this point, you should be able to use the gl.LINES given 2 coordinates.
This article was the second part of "First steps with WebGL". Stay tuned because in next articles of this series we'll see: textures, image processing, framebuffers, 3d objects, and more.
References
- http://www.corehtml5.com/trianglestripfundamentals.php
- https://mattdesl.svbtle.com/drawing-lines-is-hard
- https://stackoverflow.com/a/54585370/4467741
- https://webgl2fundamentals.org/webgl/lessons/webgl-2d-matrices.html
- https://webgl2fundamentals.org/webgl/lessons/webgl-2d-rotation.html
- https://www.youtube.com/watch?v=nlNOSNlTXEQ
