
This is a small tutorial to implement an application that predicts if it's a cat or a dog image. To do this we'll use Tensorflow.js to make the prediction directly in the browser.
I recommend reading this other article where I introduce Tensorflow.js.
However, after this, you'll be able to classify any kind of image in an easy way even without any knowledge of ML. Also, it can be replicated for any image classification problem.
We will cover the following:
- The dataset
- Training the model
- Testing our model
- Using the model in our (P)React app
- Why in the browser?
- Code of this article
- Conclusion
- References and acknowledgments
The dataset
Before we start training a model, we need to have many images of cats and dogs, as varied as possible, to not have any bias. We have two options:
- Recopilate our custom dataset
- Use an existing dataset
For this, I'm going to use this dataset from Kaggle, with 10.000 images of cats/dogs:
Thus, you only need to download it.
Note: On Kaggle you'll find a lot of available datasets, it's a good place to search for data. For our purposes, we'll choose a small dataset of 218MB. I recommend using one not too big at least for now, so you won't end up with your device's resources.
Training the model
Once our dataset of images is ready, we can train the model.
The first thing we have to know is what kind of model we want. We'll train an Image Classification Model, which after a given input image will say if it's a cat or dog.
There is a model called Mobilenet, already trained to classify 1000 different images. The problem? It does not classify the images we want. To fix this we'll use a technique called transfer learning, to use its "intelligence" to recognize our images.
Currently, we can transfer this knowledge without coding thanks to some open source tools. That's what we're going to do, we'll leave the code for the usage part of this model.
Let's use this tool:
This tool uses a layer of the MobileNet neural network located at the end (conv_pw_13_relu). This means that it works well for images similar to the ones MobileNet has trained with (animals, instruments, everyday objects...). If you want to use more different images (for example skin freckles to detect a melanoma), it may not work unless you use an earlier layer. The closer the layer is to the end, the faster it'll be and the less resources will be used when training the model.
Now you need to drag and drop the training_set folder from the downloaded dataset and wait. That's all.
Note: Depending on your device GPU performance it can take a long time. If you have chosen a bigger dataset or another layer and your browser doesn't have enough resources, you can use the ml-classifier in a Node.js environment.
Testing our model
Testing a model lets us know if it works with new images, not only the ones you have already trained. That's how we know that a model is working.
To test it, we'll use the test_set folder of the dataset. We can drag and drop it again. It contains different images from the ones we've used in the training.
It will be much faster now than before.
After checking that the trained model predicts quite well, we'll download it to use it in our app.
Using the model in our (P)React app
We are going to create a Preact app with Snowpack by doing:
npx create-snowpack-app cat-dog-detection-tfjs --template @snowpack/app-template-preact --use-yarn
Then, we'll add our model downloaded files (JSON + weights) inside cat-dog-detection-tfjs/public.
public
├── favicon.ico
├── index.html
+├── model
+│   ├── ml-classifier-dogs-cats.json
+│   └── ml-classifier-dogs-cats.weights.bin
└── robots.txt
Note: If you want to rename the model, don't forget to modify the
weightsManifestinside the.jsonfile to point correctly to the renamed.weights.binfile.
Installing dependencies
To load the model we'll use Tensorflow.js. Also, add preact/hooks to use hooks.
yarn add @tensorflow/tfjs@1.0.0 preact/hooks
Loading the model
To load our model, first we must load the Mobilenet model, as this is the model from which we have applied transfer learning. It's necessary for prediction. We will also load our model.
We're going to create two files:
- Hook to load the model
- Our component to load the hook
Hook to load the model (src/hooks/useLoadCatsDogsModel.js):
import * as tf from '@tensorflow/tfjs'
import { useEffect, useState } from 'preact/hooks'

const pretrainedModel = {
  url:
    'https://storage.googleapis.com/tfjs-models/tfjs/mobilenet_v1_0.25_224/model.json',
  layer: 'conv_pw_13_relu',
}

export default function useLoadCatsDogsModel() {
  const [state, setState] = useState([])

  useEffect(() => {
    async function loadModel() {
      const mobilenet = await tf.loadLayersModel(pretrainedModel.url)
      const layer = mobilenet.getLayer(pretrainedModel.layer)
      const pretrained = await tf.model({
        inputs: mobilenet.inputs,
        outputs: layer.output,
      })

      const model = await tf.loadLayersModel(
        './model/ml-classifier-dogs-cats.json'
      )

      setState([model, pretrained])
    }
    loadModel()
  }, [])

  return state
}
Our component to load the hook (src/CatsDogsDetection.jsx):
import { h } from 'preact'
import useLoadCatsDogsModel from './hooks/useLoadCatsDogsModel'

export default function CatsDogsDetection() {
  const model = useLoadCatsDogsModel()

  if (!model) return 'Loading the model...'

  return 'Model loaded!'
}
In order to test if it loads correctly:
- Add the
<CatsDogsDetection />component inside yoursrc/App.jsx. - Run
yarn start

We already have the loaded model. Now we are going to replace the displayed text "Model loaded!" by using this model.
Using the model
In this tutorial, we are going to implement something not too complex by simply loading an image from the filesystem. It will display the prediction (cat or dog). We could complicate it by adding a camera, but this is not the purpose of the article.
What we're going to do to get the prediction is this:
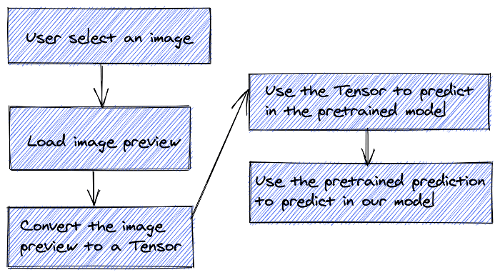
In order to implement this, we're going to replace our CatsDogsDetection component to this:
import { h } from 'preact'
import { useState } from 'preact/hooks'
import * as tf from '@tensorflow/tfjs'
import useLoadCatsDogsModel from './hooks/useLoadCatsDogsModel'

export default function CatsDogsDetection() {
  const [model, pretrainedModel] = useLoadCatsDogsModel()
  const [previewUrl, setPreviewUrl] = useState()
  const [predictionStatus, setPredictionStatus] = useState()

  function onLoadPreview(e) {
    const image = e.target.files[0]
    if (!image) return
    if (previewUrl) URL.revokeObjectURL(previewUrl)
    setPreviewUrl(URL.createObjectURL(image))
    setPredictionStatus('predicting')
  }

  async function predict() {
    const pixels = tf.browser.fromPixels(document.querySelector('img'))
    const image = tf
      .reshape(pixels, [1, 224, 224, 3])
      .toFloat()
      .div(tf.scalar(127))
      .sub(tf.scalar(1))
    const modelPrediction = model.predict(pretrainedModel.predict(image))
    const [dog, cat] = Array.from(modelPrediction.dataSync())
    setPredictionStatus(dog >= cat ? '🐶' : '😸')
  }

  if (!model) return 'Loading the model...'

  return (
    <div>
      <h1>Choose a dog or cat image</h1>
      <input type="file" onChange={onLoadPreview} accept="image/*" />
      {previewUrl && (
        <div style={{ marginTop: 10 }}>
          <img
            src={previewUrl}
            onLoad={predict}
            width={224}
            height={224}
            alt="preview"
          />
        </div>
      )}
      {predictionStatus === 'predicting' ? (
        'Predicting...'
      ) : (
        <div style={{ fontSize: 50 }}>{predictionStatus}</div>
      )}
    </div>
  )
}
What it does:
- Using the input file, we show in the
<img>element the image preview with 224x224px resolution (important to keep it). - Once the image is loaded (onLoad event) we can start predicting.
And the result:
Why in the browser?
You've probably wondered at some point why are we doing it with JavaScript, rather than Python or something else.
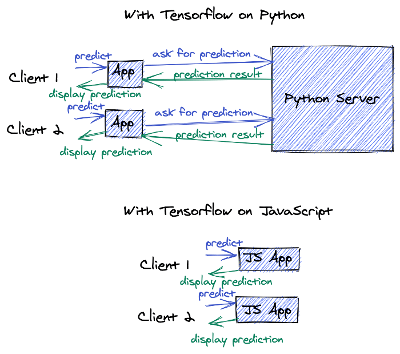
Here are several reasons:
- Faster predictions: It's not necessary to make a request to any server from our application, so we save the time it takes for the request.
- Working offline: As in the previous point, we can make predictions with our device (mobile, tablet, desktop...) even without the Internet.
- Cost zero in money: We just need to put our app on a CDN. If 2000 people are using the application at the same time to make predictions, we won't saturate any server as there is no need even to have a server. Each user will make the predictions directly from their device.
- Open-source models: Instead of hiding the models behind a server by using them with JavaScript, we are publishing them in such a way that any developer who likes the application can use the same models for their project.
- Privacy: The data is not stored in any external database nor travels on the net, it stays on the device.
Code of this article
The code of this article can be found in my GitHub:
And the demo link:
Conclusion
We've seen how to solve any kind of image classification problem with a few steps. As an example, we have implemented a cat/dog classifier. The same example can be replicated for any type of image classification:
- Skin cancer detection
- Rock-paper-scissors game
- etc
References and acknowledgments
I want to thank Kevin Scott (author of ml-classifier tool) for this article. He helped me understand and solve some problems.